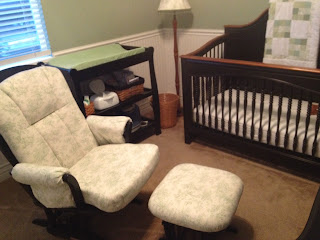
Our baby room is getting so close to being finished! And it's about time too... I'm 35 and a half weeks! I'm too big to be decorating and DIY-ing. But I had to share these two projects that I took on and finished late in pregnancy. Word of advice: if you have some major DIY projects you want to do for the nursery, get them done earlier in pregnancy. It was not fun getting up and down off the floor and leaning over fabric with a big ol' belly!
Cornices:
Since we aren't going to be in this rental house for very long and with the future of Mitchell's company always changing, I didn't want to invest a lot of money into permanent window treatment. I thought cute cornices would be a great solution and even better... foam board cornices. No wood used here.
Supplies:
Foam board
Hot glue
Duct tape
Quilt batting
Picture hangers
Fabric
First, I very carefully measured my windows. I wanted the cornices to be 8" tall and come 5" off the wall. We have one window that was 50" long and one was 74" long.
After getting measurements I went out and bought a trifold foam board like the picture below.
Mitchell lovingly measured out the strips and cut them out for me. To reinforce the folds, I hot glued popsicle sticks. I also used them to reinforce the joint when I had to lengthen the foam board for the long window. Before the popsicle sticks I attached the extra foam board with white duct tape.
Next, I cut out the sides of the cornices and hot glued those to the ends of the cornice and then reinforced with white duct tape.
To attach the cornices to the wall, I added a bit of foam board to the back of the cornice so I could use that to nail them into the wall.
Lastly, I built an arm in the middle of the cornice to add support so there was no sagging. All of these pieces were added with hot glue and reinforced with duct tape.
The next step, to add some depth/dimension to the foam boards, I wrapped the the cornices with quilt batting. For the 50" cornice, I cut 62" long piece (50" front + 2-5" sides + 2-1" bits to wrap around) and 10" high so it would wrap around as well. I attached this with the duct tape. The duct tape had trouble grabbing the batting but I just added a bit more and then it was held securely once I got the fabric on.
I cut out my fabric in a similar way as the batting and wrapped it around the cornice and attached with white duct tape as well!
The last thing I did that I didn't get a picture of was I bought picture hangers from Home Depot and attached them to sides and middle support piece. These cornices are so light that they can be hung with small nails and picture hangers!
Here they are hanging in the not complete baby room! Love them and they were super easy!
Dutalier glider:
One of Mitchell's coworkers so generously gave us their old Dutalier glider. It was gently used and in great condition. Score! But it didn't match the colors of our baby room so I decided to tackle another DIY project... painting and recovering the cushions.
One weekend, Mitchell and his best friend diligently painted the glider white to match the white furniture in the baby room. That was quite an undertaking as this glider has lots of parts and pieces. They did a fantastic job!
I took the 5 cushions to a couple upholstery places in town and found out it was going to cost $250-280 to recover them professionally plus the cost of the fabric. Yikes! Surely, I can do a decent job and save ourselves that money since it's a baby room, people... you have to keep these things in perspective.
I ordered 5 yards of lightweight, cotton fabric from an online website I found. I stressed over this project for a long time because I wasn't sure how to tackle it. Should I rip apart the cushions and use the fabric as a pattern or should I just cover the existing fabric with my new fabric?? I ended up doing both and using this tutorial as a guide.
Here is the before:
And here is the final product:
Total cost of our brand new Dutalier glider: ~$60 for paint + $37 for fabric = ~$100
If I had taken them to be done professionally it would have been about $400!
Seriously, learning how to sew has been so handy. I taught myself how to sew and can still do projects like this. If I can do it, you can do it. Plus you can save so much money by making things yourself.
And I did all of this work looking like this...


CHRISSY!!!!!! Everything looks SOO wonderful!!! You are so thrifty and talented, I just LOVE it! I can't believe you've done all this at this point either. I am so done after work that I can't imagine taking anything else on. Way to go, hot momma! XOXO!
ReplyDeleteIt looks so good and so do you! Hang in there little momma, you are so close to meeting him!
ReplyDelete